


Wednesday, 8 May 2019
Saturday, 4 January 2014

Monday, 16 December 2013
Interior Day Lighting with Vray Basic Settings

This is basic model with Vray Basic Settings.
Some of the Settings from Vray Wizard:
1. Under Global Switches off the shadows:

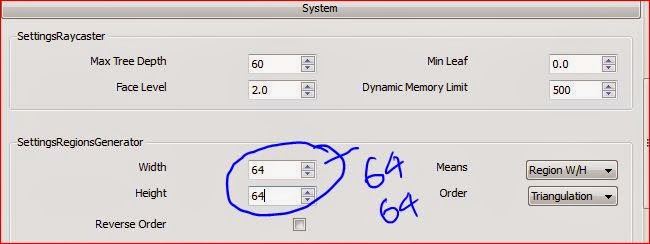
2. In the second setp select the System tab and change the SettingsRegiongenerator value from 48 to 64:
3. In the third step setting under Environment change the value of GI(Global Illuminations) under SettingEnvironment from 1.0 to 6.0:

4. This step gives your render brighter look, In this section (Color Mapping) change the Bright Multiplier value from 0.8 to 1.0.

5. This step is indicates dimensions of the render, simply set your dimension width and height:

6. This is very important part to get the depth in the rendered image.By default this option is off, you need to on this option, that option is Ambient Occlusion. Radius default is 10 you can increase as you wish here I mentioned 16 as value.

7. With these above setting if you render the image this will be the output:

Thanks for reading this article..
Saturday, 8 June 2013
IES Lights - Role in Interior Lighting

IES lights plays vital role in vray interior nights time lighting. Generally vray provides below lights
- Omni light
- Rectangle light
- Spot light
- IES light
STEPS TO FOLLOW WHEN YOU ARE USING IES LIGHTS IN YOUR SCENE
- In vray lights IES lights needs .ies light profiles. We need to download required light to use in your scene.
- If you dont want to use Global Light in your scene just off the GI from Vray settings.
- Scaling of lights distributes its light based on required area.
- Angle of light shows depth on walls.
Step1
I setup a scene with one bed and open one side, and used four IES lights, one is for focus on bed and other three lights to focus on wall.
Above used lights can be collected from vray menu.(if vray menu is not visible go to view - toolbars - vray for sketchup)

Step 2
Select IES Light and place the light in your scene where ever your want. After placing the light right click on the light, you can see the context menu like below.

Now click on edit light.

Step3:
Your can see the below IES light wizard, there I edited three areas- I applied one IES light profile. Before I applied the light profile checked and previewed in IES light viewer.
- Edited color how I want.
- The power of light default is 0. But you increase how much you want, what intensity you want. Here I used 35,000 for main light.
- for the rest of the lights which is focused on walls I maintained 10,000 as as power value.
Step4:
Now it is time to adjust the vray render settings.1. off the GI and BG from Environment.

By default GI Color and BG color is on, these options gives global lights like sun. Here we are using nights so better to off these options.
2. Ambient Occlusion: This is option gives depth to the image. By default this option is off, if you want depth on image on this option and adjust the radius of occlusion area.

Step5
Now it is time to render. Before render from the output tab in vray settings choose resolution, and press render. With above settings we got below output.
Thank you all.. If any suggestion on this article please post your comments.
Friday, 3 May 2013
About Arrow Animations

welcome
Arrow Animations
Established in 2006 an animation training studio to provide its services
to the creative industry. Arrow Animaiton Training Centre in Hyderabad
is located at Ameerpet, Hyderabad - 500 016, From Animation & Web Design
to Identity Development, Arrow Animtion is equipped to fulfill all
communication needs across various media. Our team of professionals is
dedicated in creating powerful and high quality man power for the
animation,Game,IT and multimedia industry.
Arrow Animations is also equipped with a hi-tech in which the students can shape their projects in 2D & 3D Animation, maya, Web designing and ,are all experienced instructors and have a solid experience in the field of multimedia, Gaming, Animation industries, which in turn will impact the students to gain more knowledge and exposure with industry standard techniques.
Arrow Animations is also equipped with a hi-tech in which the students can shape their projects in 2D & 3D Animation, maya, Web designing and ,are all experienced instructors and have a solid experience in the field of multimedia, Gaming, Animation industries, which in turn will impact the students to gain more knowledge and exposure with industry standard techniques.
The founders of this training institute itself have national and international exposure in the related fields. Our team includes Pring&
graphics experts, Game Programming Professionals, web solution
specialists, 2D & 3D animators, video editing and special effects
professionals.
Services
Arrow Animation
Solutions is an integrated design training solutions company. From
Animation & Web Design to Identity Development by its students.,
Arrow Animation Training Solution is equipped to fulfill all
communication needs across various media. Our team of professionals is
dedicated in creating powerful and high quality products, to
create Industry standard animation and Game professionals,Arrow
Animation is providing quality animation & Grame designing
Programming training in 2D & 3D.
Address:
Arrow Animations
#10, 2nd Floor, Elephant House
opp: Rehmat complex
Ammepet X roads
Ameerpet
Hyderabad-500016
9030041189, 8008834848, 040-30785868
Address:
Arrow Animations
#10, 2nd Floor, Elephant House
opp: Rehmat complex
Ammepet X roads
Ameerpet
Hyderabad-500016
9030041189, 8008834848, 040-30785868
Subscribe to:
Posts (Atom)


